E36 coolant level sensor replacement
Symptoms: You get the "Check coolant level" message on the OBC but the coolant level is fine. Note: replacing the coolant level sensor is not guaranteed to fix that problem, but there is a pretty good chance that it will.
Goal: replace the coolant level sensor (aka radiator levelling switch)
Performed on: '97 M3
Applies to: All E36 6-cyl cars: 325i, 325is, 328i, 328is, 323i, 323is, M3 (the procedure for 4-cyl cars is probably similar)
Time needed: ~1 hour
Disclaimer: I do not assume any responsibility for the correctness of these instructions or their applicability to the specified models. Use at your own risk! Also, use commons sense, don't do stupid things.
Overview:
If I remember correctly, when you drain the coolant from the radiator drain plug at the bottom of the radiator, the expansion tank (where the coolant level sits) remains full. Even if I don't remember correctly and this is not true, it's kind of a hassle to lift the car and make a mess with spraying coolant from the bottom of the radiator. Plus I don't have a garage, so I wanted to replace the coolant level sensor in my parking lot, without even lifting the car to drain the coolant. The solution: pull out the coolant from the coolant expansion tank/reservoir through the top, and then replace the coolant level sensor.
Instructions
- Get a new coolant level sensor (for my 97 M3, the part number was 61318360855; I got one online from a non-dealer company for $25). Also get a suction gun, which is basically a huge syringe with a hose (I got a suction gun from my local auto parts store for $15). Or come up with another device with which you can syphon the coolant out of the coolant tank/reservoir into another container.
- Refer to these diagrams while reading the steps below:
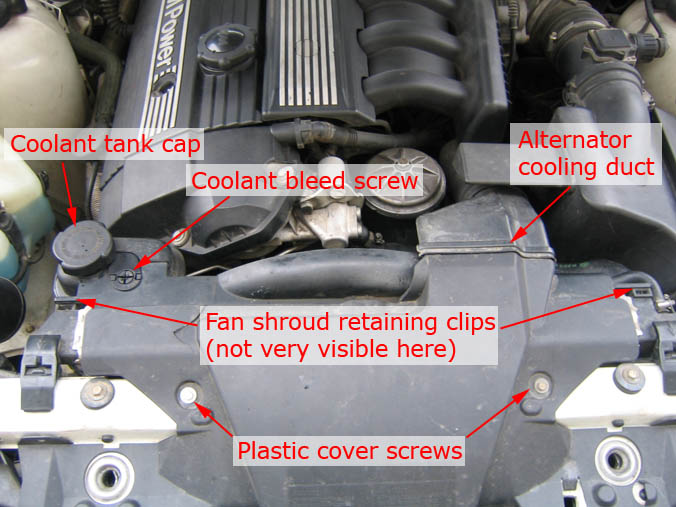
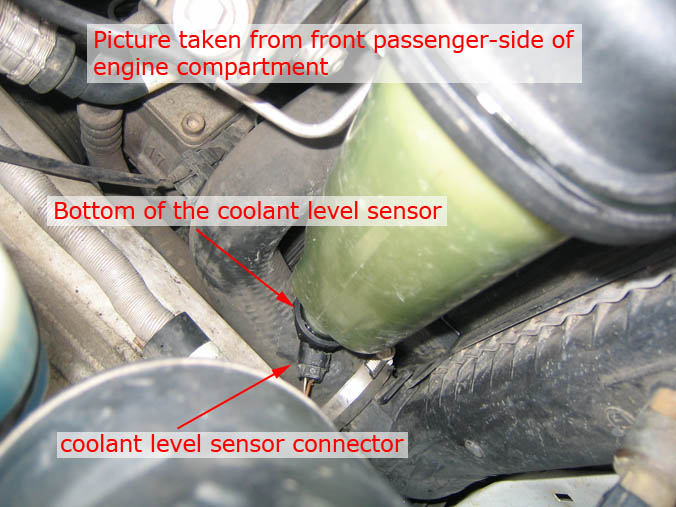
- When the engine is relatively cool (if you've just driven it, let it cool down for at least half an hour, preferably more), open the coolant tank cap and suck out the coolant from it with the suction gun. Transfer the coolant to another container. I used a few empty water bottles, and the total volume that I needed was about 3 liters (a bit more than 3 quarts). The hose (or whatever you're using) will most likely hit your existing coolant level sensor when you're pulling out the coolant; make sure you route your hose around the sensor to get access to the very bottom of the tank. Also note that the tank will seem to fill itself up magically after you pull out coolant. That's because coolant is getting transfered from the radiator to the tank (I think)... just keep pulling out coolant and eventually you'll see the bottom of the tank.
- There will inevitably be some coolant left that you can't pull out. That's fine, it'll just pour out from the bottom in the next step... so maybe put some low container or paper towels under the car if you're worried about coolant dripping on the floor.
- Unscrew the large black plastic nut at the bottom of the coolant level sensor (see picture above). In my case, it wasn't tightened at all, so I was able to unscrew it just with my hands and no tools. If it's tight, you can use an adjustable wrench, or a wrench of the correct size (I don't know what size) to untighten it. While you turn it, some coolant will start dripping and spilling on the floor... but it shouldn't be too much.
- No need to disconnect the sensor connector yet.
- If you can take out the coolant level sensor at this point, do so. I couldn't, because the radiator hose that passes below it was in the way. So, I had to lift the fan shroud (to which the coolant tank is attached) to give it some more space at the bottom. To do that:
- unscrew the 2 plastic cover screws (see picture/diagram above). There are 2 more screws that hold it more toward the front of the car, but you can probably leave those screwed in. Just removing the ones that are shown in the picture should give you enough play to lift the fan shroud a little.
- Undo the fan shroud retaining clips. Those clips are composed of 2 screwless plastic parts; you need to pry out the smaller part first, then pry out the bigger part (you'll see what I'm talking about). Here's a picture of their locations:
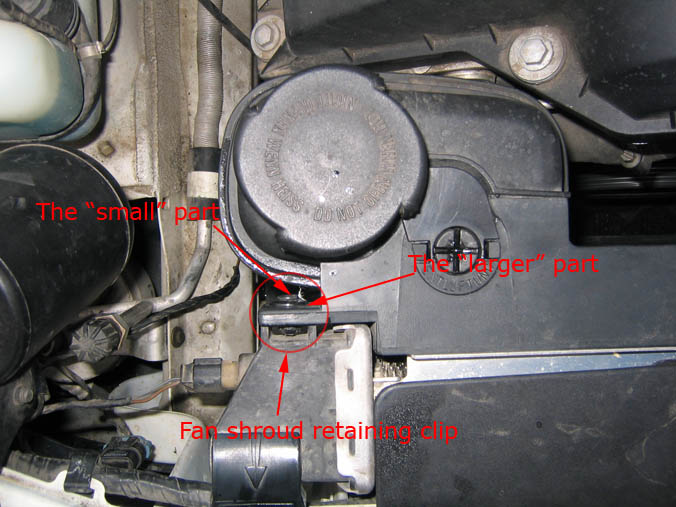
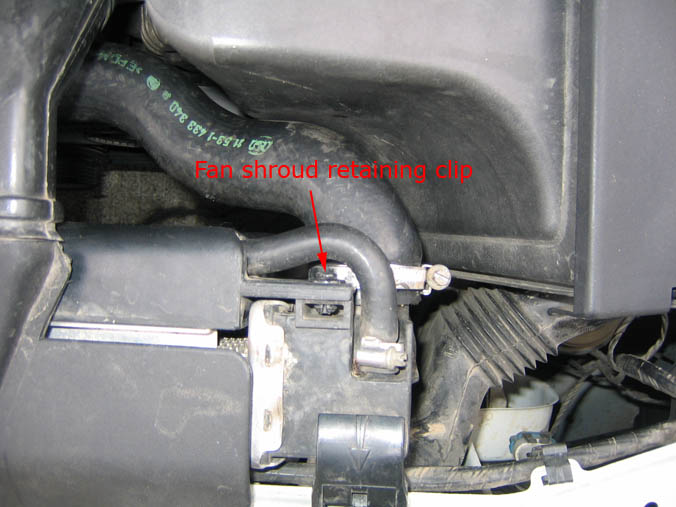
- You may also pull out the alternator cooling duct (just pry it out) to give you some extra wiggle room
Now pull up the whole fan shroud along with the coolant tank. This should give you enough room at the bottom to pull out the old coolant level sensor. When you take the sensor out, disconnect the connector from it.
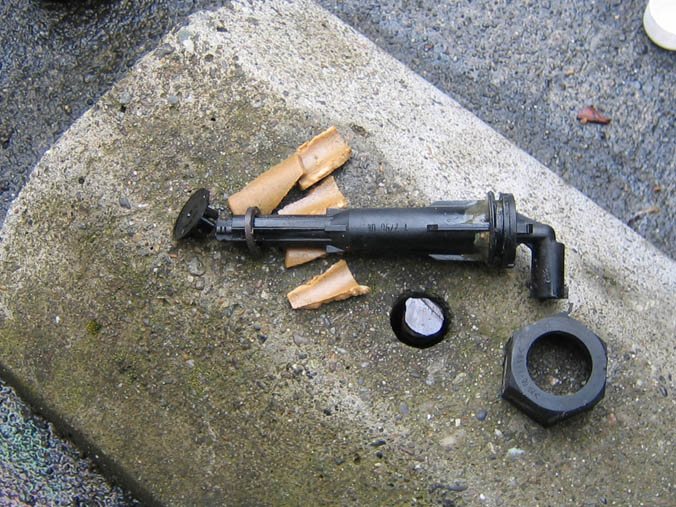
- Here's what my old coolant level sensor looked like... the the floater thing was completely disintegrated. Little pieces of it were floating around in the coolant. Not good.
- This is a good time to rinse the tank (especially if you had floating pieces of the old sensor like I did) by pouring some distilled water in it (it will flow directly to the ground, of course).
- Connect the connector to the new sensor, put in the sensor in the same place where the old one was, and screw the big black pastic nut by hand. Just hand-tightening it as tight as you can (without breaking it) should be good.
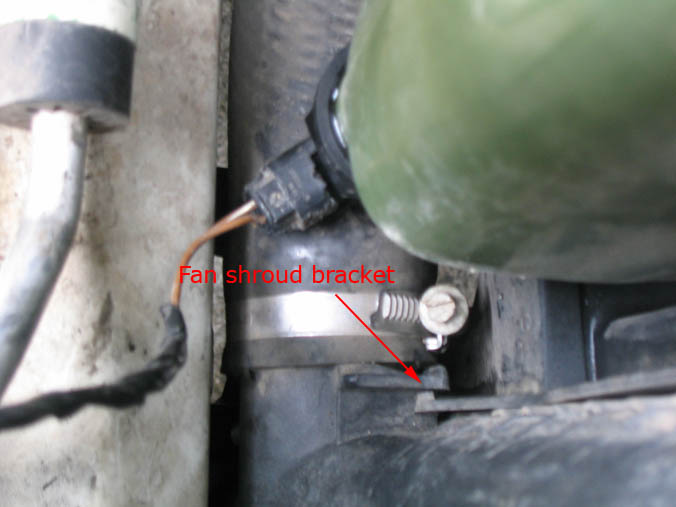
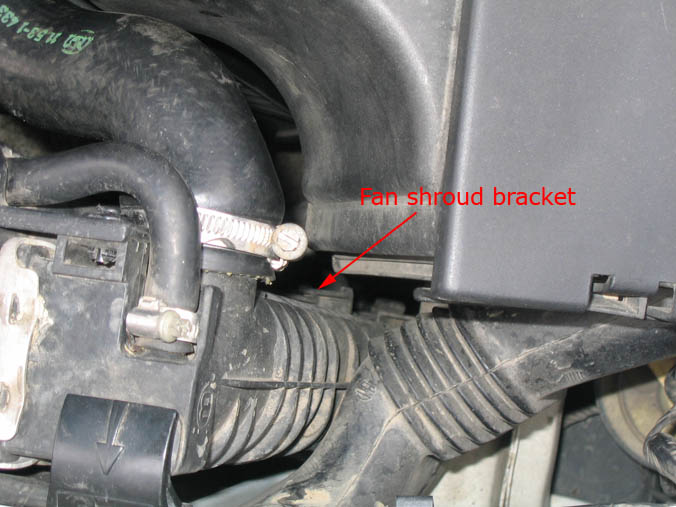
- Put the fan shroud back in its place. This is a tricky step because there are 3 brackets that need to align the right way. I have pictures of 2 of them (the ones on the sides) aligned properly. The third one is at the top, below the plastic cover. You'll see it, it's pretty obvious.
- Put the plastic cover screws back on, and reconnect the alternator cooling duct if you have disconnected it.
- Pour new coolant into the tank. If you reach the "KALT" mark (on the back of the coolant tank), let it settle for a few seconds - most likely, the level will keep going down a little as you pour it. Let it settle and keep pouring until it doesn't go down anymore. Fill it up to the "KALT/COLD" mark.
- Bleed the cooling system. If you don't know how to do that, look at the last few steps of my write-up for the thermostat replacement.


